Creating Your Own Crypto Tokens

Creating Your Own Crypto Tokens
Within the Ethereum blockchain, we can record transactions and run smart contracts. These things allow us to run DApps (decentralized applications) and which can support the running of the infrastructure in return for some payment (Ether). A DApp can also create tokens for new currencies, shares in a company or to prove the ownership of an asset. ERC-20 is a standard that allows for the sharing, transfer and storage of tokens.
Making some tokens
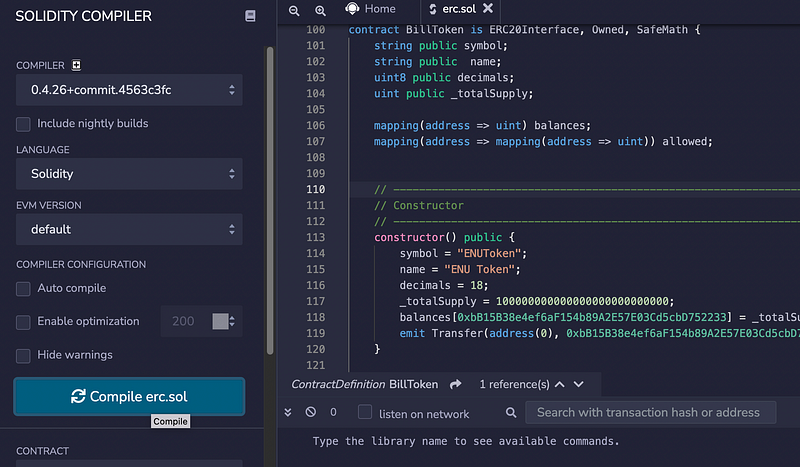
Now, let’s say that you want to create some crypto tokens for student work, and where they could be rewarded for their good work. So, let’s create a token named “ENUToken”. First, we open up remix.ethereum, and enter the following Solidy contract [code]:
When you create your own contract, make sure you change the public constructor() with: the symbol, the name, and the wallet ID:
constructor() public {
        symbol = "ENUToken";
        name = "ENU Token";
        decimals = 18;
        _totalSupply = 100000000000000000000000000;
        balances[0xbB15B38e4ef6aF154b89A2E57E03Cd5cbD752233] = _totalSupply;
        emit Transfer(address(0), 0xbB15B38e4ef6aF154b89A2E57E03Cd5cbD752233, _totalSupply);
    }
The wallet ID is the public ID of your wallet in Metamask. You thus need to change “0xbB15B38e4..33” or for your public ID on the test network. This will allow you to transfer the tokens into your wallet. Now we can compile the contract:
Next, we will deploy to the Ropsten test network:

After this, our contract will be shown as being pending deployment:
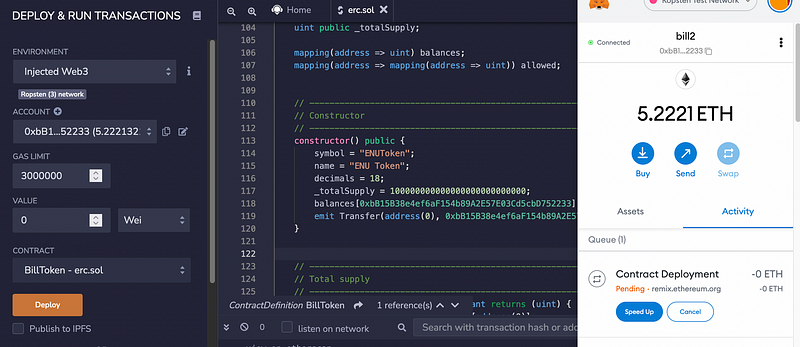
It will take 10–15 minutes to deploy, but can be speeded up by increasing the gas limit:

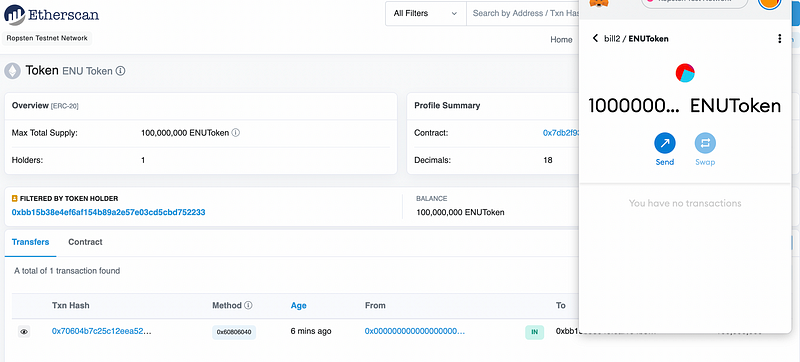
Once deployed, we can view the contract details:

And can then view the transaction for the contact [here]:

And then view the contact [here]:

Next, we select the Contract tab:

And then select “Verify and Publish” and enter the details of the compiler version (v0.4.26):

We then need to copy-and-pasete the contract code into the Source Code text box:

After less than 45 seconds, the contract will be approved:

When the contact is run there is a constructor to transfer the tokens to the wallet we have defined (and who will be the owner of the token). We can now go back to the wallet which is specified, to see if the tokens have been transferred:

Next, we can transfer the tokens into our wallet, by defining the contract address:

We will now have our new tokens in the wallet:

And with:
We can now transfer the cryptocurrency to students:

Conclusions
And that’s how you create cryptocurrency!