So Goodbye To Our Old Ecomomy — And Hello To The Tokenized Economy

So Goodbye To Our Old Economy— And Hello To The Tokenized Economy: A Practical Guide to NFTs
Just this week the UK government committed itself to building an infrastructure around NFTs, and thus supporting the rise of the tokenized economy [here]:

So let’s forget the hype around NFTs in the art world and on Opensea, and look at the possibility to mint cryptographic tokens which can be linked to real things. The example I will use is to award an NFT to students completing a module, and where I (as the tutor) can mint NFTs for my students, and award them with a grade. I token will be minted by me, and be unique, and I will allocate it to the student.
Old world, new world
We live in an old digital world — filled with old protocols and methods that derive from our paper-based approaches. Our advancement in the 21st Century has been to copy and paste our wet signatures into documents and create PDFs on them. Overall, this is just silly and has zero trustworthiness. The future must be toward using cryptography certainty with our transactions, especially to represent physical assets with tokens. These tokens are now often defined as NFTs — non-fungible tokens, and where each NFT is unique and can be owned by someone and transferred to someone else. So let’s build one.
For normal crypto tokens (ERC-20) we use FT (Fungible Tokens) and where there is a finite number of these, and each of these is the same. For example, I could release 1 million ERC-20 tokens and then trade with them. They will all have the same value, and I cannot mint any more. With NFTs (ERC-721), we can mint any number of cryptography tokens, and each will have an owner. Each of these can have its own value, or be pinned to a physical asset or identity. For example, as a tutor, I could assign each of my students to an NFT, and where we link the NFT to the student.
Overall, we create these with a smart contract, and where there is an “owner” of the creation of the tokens. It is this owner who will create the tokens (“minting”) as required, and then allocate them to new owners. The processing of “minting” the tokens will cost some Ether to create. In this example, I will create an award token for the completion of a module, and allocate the token to the student.
First, we start off with a smart contract:
This contract defines we are creating a “Bill Token”, and where Open Zeppelin will integrate all the required methods that are required to interact with the token (such as creating it, viewing the ownership of tokens, and in allocating it to another owner). For this we can use Remix (https://remix.ethereum.org) to create and compile the code:

Once it has been compiled, we can then test it locally by running our own Ethereum network. We do this by running ganache:

We can see this has a number of accounts already created. Now we will deploy the smart contract for “Bill Token” to the local network. For this, we have Web3 Provider as our environment, and then select our contract (“BillToken”):

If successful, we will see the account of “0x78…” be charged some gas, and where the contact has been created:

The address of “0x7d8..” is now the owner of the creator of the token, and then can allocate these to other addresses. We now have a number of functions that we can use to “mint” and allocate the tokens:
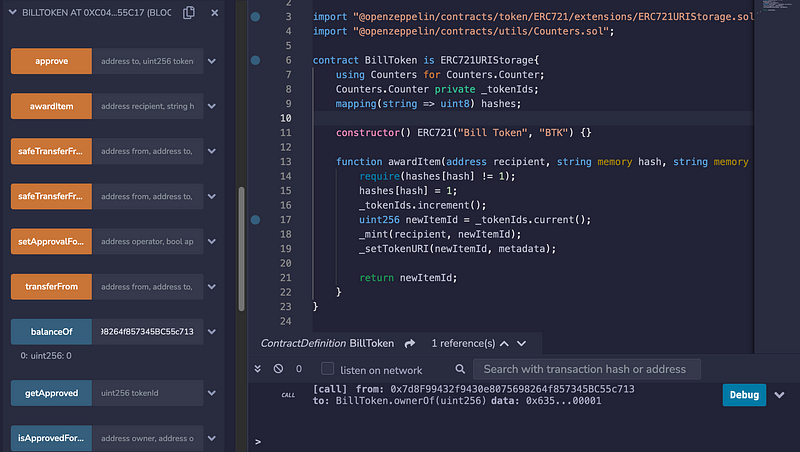
The awardItem function can be used to mint an NFT and allocate it to a given address. So, let’s say we are giving our NFTs for module marks in Applied Cryptography. First we create the metadata for the NFT as a Json file, and add it to a URL:
{
    "name": "Applied Crypto",
    "description": "Public Key Encryption",
    "image": "https://asecuritysite.com/public/bob.png",
    "grade": 87
}
Let’s now allocate one new “Bill Token” to the third address on the address list (0x391…). We will allocate this address to Alice, and where Bob is the creator of the NFT:

Once we transact, we can see the miners have successfully picked up the mint:

And that the owner of the NFT (Bob) has been charged some gas (0.01 Eth):

If we now look at Alice’s balance, we see she has one token:

And if we want to view the name and the owner of the token number 2, we get it here:

In this case, we see that Alice is the owner of the token (as she has an address of 0x39…).
And that’s it! I am now the minter of my own cryptography award scheme.
Here’s to new world!
Postscript
You can install Open Zeppelin with:
npm install @openzeppelin/contracts
For ganache, go to:
https://trufflesuite.com/ganache/
and download the version for your operating system:

Once tested with your local network, it is then fairly easy to test on an Ethereum test network (such as Ropsten).